Homemade Eggnog: A Cozy Treat for Holiday Breakfasts and Brunch

Homemade eggnog is just one of those things that feels like a real treat, especially when mornings are chilly and you want something comforting. I mean, you wake up and there’s this creamy, sweet drink waiting for you—kind of like a holiday hug in a mug. It’s perfect for those holiday breakfasts, or even a lazy brunch when you’re just, you know, craving something special.
Honestly, homemade eggnog isn’t just for winter evenings. It can totally be a Drink that makes breakfast or brunch feel festive, too. There’s something about making it yourself that makes the kitchen feel warmer. Wait—no, I mean, it just adds that homemade magic. And the best part? You get to control all the little details, from nutmeg to how much sweetness you want.
Personal Anecdote
So, the first time I made homemade eggnog, I was actually kind of nervous. My grandma used to whip it up every December—hers was always so creamy and just the right amount of spice. I remember standing by the stove, whisking like crazy, hoping I wouldn’t scramble the eggs. Turns out, it’s not as tricky as it sounds. And even if it’s not perfect, it’s still delicious.
Why This Recipe is Special
What I love about this homemade eggnog is how it turns an ordinary Drink into something you want to share with everyone—kids, grownups, whoever. You get those rich, cozy flavors without any weird stuff from a carton. Also, it keeps really well in the fridge, so you can enjoy it for days (if it lasts that long, honestly).
Sometimes I’ll even pour a little over pancakes at brunch—sounds odd, but trust me, it’s dreamy. Homemade eggnog just brings out that holiday spirit, even if you’re still in your pajamas.
Ingredients breakdown
| Ingredient | Quantity |
|---|---|
| Large egg yolks | 6 |
| Granulated sugar | 1/2 cup |
| Heavy whipping cream | 1 cup |
| Milk | 2 cups |
| Ground nutmeg | 1/2 teaspoon |
| Salt | Pinch |
| Vanilla extract | 1/4 teaspoon |
| Ground cinnamon (for topping) | To taste |
Utensils and substitutions
For this homemade eggnog, you just need pretty basic stuff: a medium bowl, a whisk, saucepan, and something to strain with like a fine-mesh sieve. If you don’t have heavy cream, you can swap in half-and-half, but the texture might be a bit lighter. And, well, if you want it dairy-free, you could try almond milk or oat milk, but the flavor changes a bit.
Also, just a heads up—if you’re wondering about safety with raw eggs, it’s best to cook the mixture to at least 160°F. You can check out more info on safe egg handling at foodsafety.gov. It’s honestly worth the quick peek, especially if you’re serving little ones or anyone with health concerns.

Step-by-step method
Step 1
First, in a bowl, whisk together the egg yolks and sugar. The mixture should look pale and a little fluffy. Sometimes, I get distracted and over-whisk, but honestly, it still turns out delicious! Homemade eggnog is forgiving like that.
Step 2
Next, in a saucepan, heat the cream, milk, nutmeg, and salt over medium-high. Stir often and watch closely—I’ve let it simmer a bit too hard before, but just lower the heat and keep going. Once it’s warm, slowly add a spoonful at a time to your egg mixture, whisking each time. This step always feels a little messy to me, but that’s part of the charm.
Step 3
After most of the milk is mixed in, pour everything back in the pan. Whisk for a minute or so until it thickens up, then take it off the heat and stir in the vanilla. Strain into a pitcher, cover, and chill. Sometimes I skip the blending step if I’m in a rush, but blending does make it extra smooth. Sprinkle cinnamon or nutmeg on top before serving for that cozy homemade eggnog touch.
Tips and tricks to make this recipe shine
Don’t rush the tempering process, or your eggs could scramble a bit—I’ve done it, and it still tastes fine, just not as pretty. For an even richer flavor, let your homemade eggnog chill overnight. You can also adjust the nutmeg to taste. If you want a lighter drink, swap half the cream for more milk. This recipe is best enjoyed with loved ones, even if it’s not perfect every time.
What to serve with this recipe
Honestly, homemade eggnog pairs perfectly with holiday cookies, gingerbread, or even a slice of coffee cake. Sometimes, I just enjoy it with a handful of roasted nuts or a cinnamon stick for stirring. If you’re sharing with friends, try setting up a little dessert table—everyone will love dipping treats into their glass.
How to store and reheat
Store your homemade eggnog in a covered pitcher or jar in the refrigerator. It keeps well for up to a week, though it usually disappears much faster in my house! If it thickens too much, just whisk in a splash of milk before serving. I don’t reheat it, but if you like it warm, gently heat on the stove, stirring constantly, and never let it boil. Enjoy every last drop—it rarely lasts long enough for leftovers!
Print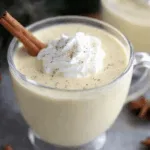
Easy Homemade Eggnog Recipe for Cozy Drink Moments
- Total Time: 2 hours 20 minutes
- Yield: 4 servings
- Diet: Vegetarian
Description
A creamy and comforting eggnog made with rich egg yolks, cream, and milk, flavored with nutmeg and vanilla for a classic holiday favorite.
Ingredients
6 large egg yolks
1 cup heavy whipping cream
2 cups milk
1/2 teaspoon ground nutmeg
pinch of salt
1/4 teaspoon vanilla extract
ground cinnamon for topping
Instructions
In a medium bowl, whisk together the egg yolks and sugar until the mixture is light and creamy.
In a saucepan over medium-high heat, combine the cream, milk, nutmeg, and salt. Stir frequently until the mixture reaches a gentle simmer.
Gradually add a large spoonful of the hot milk mixture to the egg yolk mixture, whisking vigorously each time. Repeat this process, adding one spoonful at a time, to temper the eggs.
Once most of the hot milk has been incorporated into the eggs, pour the mixture back into the saucepan.
Whisk constantly for about a minute, or until the mixture thickens slightly and reaches around 160 degrees Fahrenheit on a thermometer. It will continue to thicken as it cools.
Remove the saucepan from heat and stir in the vanilla extract.
Strain the eggnog through a fine-mesh sieve into a pitcher or container, then cover with plastic wrap.
Refrigerate until thoroughly chilled. For a thinner, completely smooth texture, blend the chilled mixture with one or two tablespoons of milk until smooth.
Serve topped with a sprinkle of cinnamon or nutmeg and, if desired, fresh whipped cream.
Store the homemade eggnog in the refrigerator for up to one week.
Notes
Tempering the eggs is essential to prevent scrambling. Adjust the thickness by adding milk after chilling to your preference. Always keep refrigerated and consume within one week.
- Prep Time: 10 minutes
- Cook Time: 10 minutes
- Category: Drink
- Method: Whisking and gentle cooking
- Cuisine: American
Nutrition
- Serving Size: 1 serving
- Calories: 300
- Sugar: 20
- Sodium: 90
- Fat: 22
- Saturated Fat: 14
- Unsaturated Fat: 6
- Carbohydrates: 15
- Fiber: 0
- Protein: 6
- Cholesterol: 370
FAQ
Can I make homemade eggnog ahead of time?
Yes, making it a day ahead gives the flavors time to blend and deepen. Just keep it chilled until serving.
Is homemade eggnog safe for kids?
Absolutely! This recipe cooks the eggs, so it’s safe for everyone to enjoy.
Can I use less sugar?
Of course! You can adjust the sweetness to your liking, though I find the original amount just right.
Can I freeze homemade eggnog?
Freezing isn’t recommended as the texture changes, but it keeps well in the fridge for several days.
What if my eggnog is too thick?
Just blend in a bit of extra milk until you reach your favorite consistency.
There’s something truly special about sharing homemade eggnog during the holidays. Even if it’s not picture-perfect, the cozy flavors and simple process always bring smiles. Don’t stress over little mistakes—some of my best batches happened by accident! If you try this recipe, I’d love to hear how it turned out. For more heartwarming ideas and cozy drinks, follow us on Pinterest and join our kitchen adventures.